Bringing Cyanotype to Schools and Local Artists
- clairesettle
- Mar 11, 2025
- 5 min read
Updated: Sep 26, 2025
For eighteen years I worked for an independent school as an art technician and in that time I learned many different art forms and the techniques of how to teach them. This was the plus point of working as a technician and I have many people to thank for this teaching. Ross Wallis, Jo Millar, Cathy Pink, Ali Shurville and Sara Read.
There are two disciplines that I feel would be well received by local (and not so local) schools and art groups in the South West.
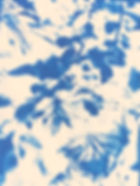
Cyanotype is the first discipline which made a huge impression on me when I first learing how to do it. For those who are unfamiliar with the technique, it is this. Using an UV sensitive solution ( a mixture of potassium ferricyanide and ferric ammonium citrate) which is applied to paper and allowed to dry. Next you can apply some simple flora like Lavender, and lay it over the paper. Lay the paper and lavender out under the sun and in a short space of time, the paper, where the sun has hit, will turn Cyan blue. This is then washed under a running tap to fix the picture.
This is the most simple way of achieving good results. However, there is one unknown aspect of this technique. The sun, It is not always available when we want it, which can be particularly frustrating when trying to make a cyanotype image.
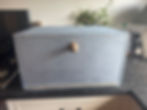
The answer to this issue is to make a portable UV box. To be properly portable it has to be light to carry, and this means that it will have to be made from Beech Plywood which is strong and very light.

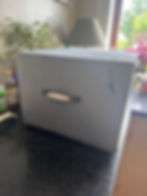
The tray was made of 6mm Poplar plywood. Ideally both the box and the tray would have been made from Poplar plywood as it is much lighter, however, there was not enough to do the box too.
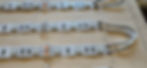
The UV LED strip (in parallel) needed to be soldered together and whilst it looks like it has been set up in series, in fact, it is continuing in parallel.


I did the soldering and learned the system for good soldering which is 'tin, tin, join'
this means that solder is applied to the soldering iron, then this soft solder, is then held briefly to the small copper connection plate. Again more solder is put onto the soldering iron and then applied to the back of the wire to be soldered. You then run the soldering iron along the wire with the soft solder so that the solder is attached to the wire itself. Finally, the soldering iron is again loaded up with more solder and then the wire is held near the connection to be soldered and the soft solder on the iron is applied to the blob of solder on the connection.
All the way down, + to + and - to -

Finally each piece of UV strip is secured by hot glue (glue gun).
Having tried the Cyanotype UV box out, I'm pleased to say it works well. However, the UV needs to be more powerful and therefore I needed to double the UV lighting.

The door opens downwards to enable removal of inner tray for loading cyanotype paper.
I have fitted handles at each side to that carrying it, is not a burden.
In order to teach a lesson, a lesson plan is needed. This is to ensure that learning is happening, and that whoever is learning, they understand what is being done.
Lesson Plan: Introduction to Cyanotype Printing
Grade Level: Primary (Ages 7-11)
Subject: Art & Science
Lesson Duration: 45-60 minutes
Lesson Objectives
By the end of the lesson, students will:
1. Understand what cyanotype printing is and its historical significance.
2. Learn how sunlight interacts with photosensitive materials.
3. Create their own cyanotype prints using natural objects.
Materials Needed
Pre-treated cyanotype paper or a cyanotype kit
Trays or shallow containers for rinsing
Water source (sink or bucket)
Natural objects (leaves, flowers, feathers, etc.)
Transparent sheets or stencils (optional)
Sunlight or UV lamp
Paper towels for drying
Lesson Structure
1. Introduction (10 minutes)
Show students examples of cyanotype prints.
Explain that cyanotype is an early photographic process invented by Sir John Herschel in 1842 and was used by Anna Atkins, the first person to create a photographic book using this method.
Discuss how cyanotype works:
Special paper is coated with chemicals that react to sunlight.
When objects block the light, those areas remain white while the exposed areas turn blue.
Questions to Engage Students:
Have you ever seen a cyanotype print?
Why do you think different materials react to sunlight differently?
Method
2. Activity: Making Cyanotype Prints (30 minutes)
1. Preparation (5 minutes):
Give each student a sheet of cyanotype paper (keep it in a dark envelope until use).
Let students arrange their objects on the paper.
2. Exposure (10-15 minutes):
Take the papers outside into the sunlight (or use a UV lamp if it is a cloudy day).
Leave them exposed for 5-10 minutes, observing the color change.
3. Rinsing & Drying (10 minutes):
Carefully rinse the papers in water for 1-2 minutes to stop the chemical reaction.
Lay them flat on paper towels to dry.
4. Discussion & Reflection (10 minutes)
Evaluation
Compare the prints and discuss how different objects created different effects.
Ask students:
What did you notice about the light and shadow?
What other materials do you think would make interesting cyanotypes?
Explain how cyanotypes are still used in art and science today.
Assessment & Extension Ideas
Assessment:
Observe student engagement during the process.
Ask students to describe what they learned about how sunlight affects the paper.
Extensions:
Cyanotypes can be made using transparencies made from photographs (see below image).
Experiment with toning cyanotypes by soaking them in tea or coffee for different shades.
Link with a science lesson on UV light and photosensitivity.
Safety rules for cyanotype printing.
Health and Safety Instructions: Using a UV Unit for Cyanotype Printing (School Setting)
1. General Safety Requirements:
Only trained staff or supervised students are permitted to use the UV unit.
Ensure the UV unit is placed in a well-ventilated area, away from direct contact with water or flammable materials.
Read and follow the manufacturer’s operating instructions before use.
2. Personal Protective Equipment (PPE):
Wear safety goggles to protect eyes from accidental UV exposure.
Use gloves when handling cyanotype chemicals or treated paper to avoid skin irritation.
Lab coats or aprons should be worn to protect clothing from chemical stains.
3. Operating the UV Unit:
Ensure the power supply is appropriate and that the UV unit is plugged into a grounded socket.
Do not open the UV unit while it is operating—UV light can cause serious eye and skin damage.
Set a timer for the required exposure time (usually between 5–15 minutes depending on light strength and desired effect).
Always switch off and unplug the unit when not in use.

CYANOTYPE PRINTING: UV UNIT SAFETY RULES
1. BEFORE YOU START
Supervision required: Only use the UV unit with a teacher present.
Read instructions: Know how to operate the UV unit safely.
2. USING THE UV UNIT
Never open the unit while it’s on!
Set a timer—exposure usually takes 5–15 minutes.
Always turn it off and unplug when done.